
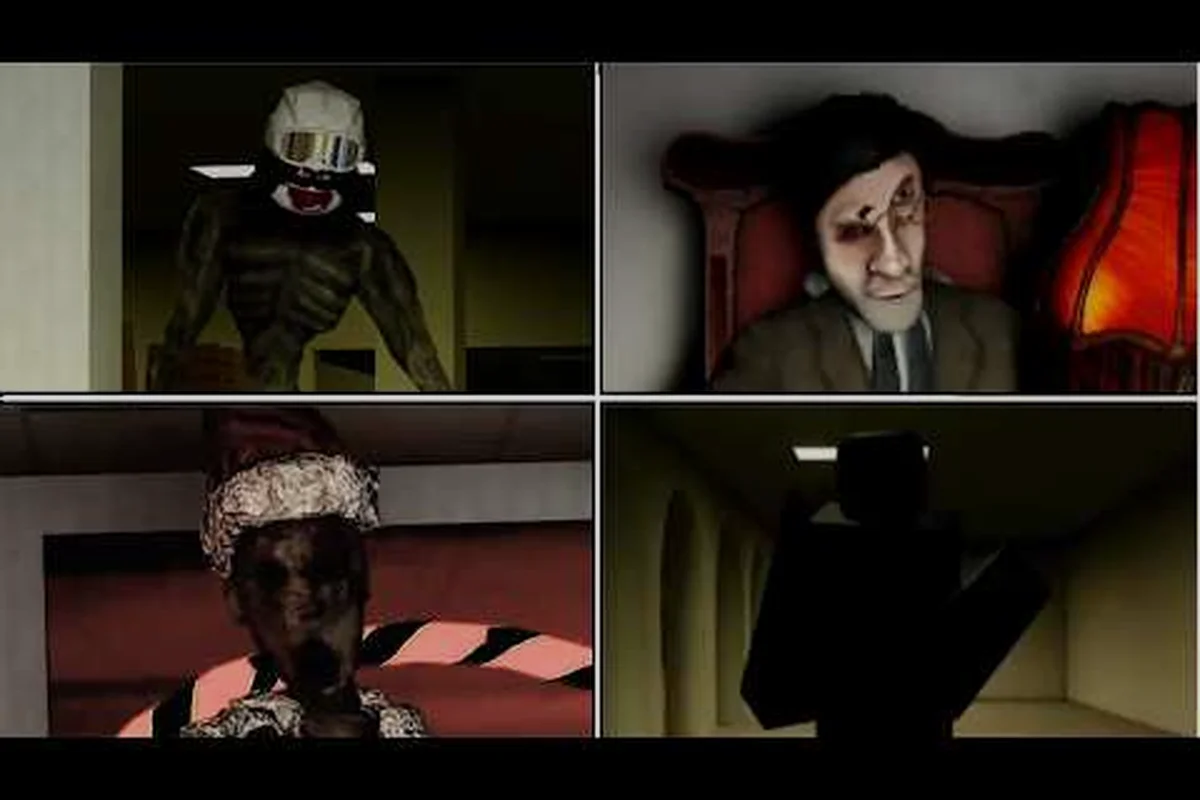
The Unseen Liminality looker guide you are about to read breaks down exactly how to survive one of the most unsettling encounters in the beta. The following chair entity patrols the endless hallways with a gaze that punishes hesitation, and most new players get caught within their first few minutes of exploration. Understanding how to avoid the looker is not optional if you want to reach the deeper Areas of Interest, because this entity actively hunts based on line of sight rather than random wandering.
What makes this threat different from the other creatures lurking in the backrooms-inspired map is its behavioral pattern: it does not chase you down a corridor the way you might expect. Instead, the unseen liminality following chair locks onto your position the moment it sees you, and it will continue tracking you through multiple rooms unless you break its line of sight completely. This guide covers the entity's spawn logic, its detection mechanics, and the exact movement techniques that keep you safe, so you can explore with confidence instead of constantly glancing over your shoulder.
Understanding the Looker's Detection Mechanics
The looker entity operates on a vision cone system that is far more forgiving than most players realize, but the consequences of being spotted are severe enough that you cannot afford to test its limits carelessly. According to community reports compiled on the Unseen Liminality Wiki, the entity's detection range extends roughly 40 studs in a straight line, with a peripheral vision arc of about 120 degrees. This means you can actually slip past it if you approach from the correct angle, but sprinting through its field of view is almost always fatal.
The detection mechanic works in stages rather than instantly triggering a chase sequence, which gives you a small window to react when you first notice the chair swiveling toward you. During the first second of exposure, the entity enters what players call the "aware" state, where it stops moving and begins rotating toward your position. If you break line of sight during this brief window, the chair will resume its patrol route as if nothing happened, making this the safest escape window in the entire encounter.
However, if you remain visible for more than two seconds, the entity transitions into its "locked" state, and this is where the real danger begins. Once locked, the following chair accelerates to roughly 1.5 times your sprint speed, which means outrunning it in a straight corridor is mathematically impossible. Your only reliable option at this stage is to use environmental geometry to create distance, because the entity cannot navigate tight corners as efficiently as a player can.
| Detection Stage | Time to Trigger | Entity Behavior | Player Response |
|---|---|---|---|
| Unaware | N/A | Patrols fixed route | Move freely, maintain distance |
| Aware | 1 second of visibility | Stops, rotates toward player | Break line of sight immediately |
| Locked | 2+ seconds of visibility | Chases at 1.5x sprint speed | Use corners and doorways to escape |
| Lost | 5 seconds without sight | Returns to patrol route | Crouch and wait before moving |
The unseen liminality how to avoid the looker question ultimately comes down to understanding these four states and knowing which one you are currently in at any given moment. The aware state is your best friend because it gives you a full second to react without any penalty, while the locked state requires immediate and decisive action. Players who panic and sprint in a straight line during the locked state almost always get caught, because the entity's speed advantage becomes insurmountable in open areas.
Visual and Audio Cues That Signal Danger
The game provides several warning signals before the chair entity actually spots you, and learning to read these cues is essential for survival. The most obvious indicator is a low-frequency hum that intensifies as the entity approaches, which you can hear even when the chair is around a corner or on a different floor. Community testing suggests this audio cue has a range of roughly 60 studs, giving you several seconds of advance warning before the entity even enters your visual range.
Visual cues are subtler but equally important, because the chair's appearance changes slightly depending on its current state. When the entity is unaware, its legs move in a mechanical, rhythmic pattern that matches its patrol speed. When it enters the aware state, the chair stops completely and the seat cushion appears to shift slightly, as if something invisible is adjusting its position. Players who have spent significant time studying the entity report that this animation change is the most reliable way to detect the aware state without relying on audio alone.
The following chair entity also leaves a faint trail of static in the air behind it, which is visible only when you are within 15 studs of the entity's path. This trail persists for about three seconds after the chair passes, allowing you to track its movement patterns even when it is out of direct sight. Experienced players use these trails to map patrol routes and identify safe waiting spots, which is particularly useful in the maze-like sections of the Pool Rooms level.
Effective Stealth Tactics Against the Following Chair
Mastering stealth against the unseen liminality following chair requires a completely different approach than fighting other entities in the game, because the chair cannot be stunned, distracted, or outrun in open spaces. The core principle is simple: the entity relies entirely on line of sight, so your goal is to ensure it never gets a clear view of your character model. This sounds straightforward, but the game's level design often places patrol routes in areas with limited cover, forcing you to think creatively about positioning.
Crouching is your most valuable tool in this encounter, because it reduces your visibility range by roughly 40 percent according to player testing. A standing player can be detected from the full 40-stud range, while a crouched player is only visible from about 24 studs away. This difference is significant enough that you can often pass within a few feet of the chair's patrol route without triggering its awareness, provided you are moving slowly and staying low.
The sprint mechanic is a double-edged sword in this situation, because while it lets you cover ground quickly, it also increases your detection range by about 15 percent. Sprinting near the entity is almost always a mistake, since the increased visibility range combined with the noise you generate makes it far easier for the chair to lock onto you. Instead, use sprint only when you are confident the entity is at least 50 studs away, then transition to crouch walking as you approach its patrol zone.
-
Use doorways as visual barriers — the entity cannot see through doorframes, so positioning yourself just inside a doorway breaks line of sight completely
-
Wait for the chair to pass before moving — patrol routes are predictable, so observe for one full cycle before committing to a crossing
-
Hide behind furniture and pillars — objects that are taller than your crouched character model provide reliable cover
-
Avoid open intersections — these areas give the entity multiple sightlines into your position, making them extremely dangerous
-
Move during the entity's turn animation — the chair rotates slowly, giving you a two-second window to cross behind it
Using the Environment to Break Line of Sight
The level design in Unseen Liminality is specifically crafted to create tense stealth moments, and the environment provides more hiding options than most players initially realize. The Pool Rooms level, in particular, features numerous pillars and decorative elements that break line of sight effectively, while the hallway sections of the main lobby area offer fewer options and require more careful timing. Understanding which areas provide natural cover is essential for planning your route through any given section.
One of the most effective techniques reported by experienced players is the "corner peek" method, where you position yourself just around a corner and use the third-person camera to observe the entity's position without exposing your character model. This allows you to track the chair's movement pattern safely and time your crossing with precision. The technique requires some practice to master, because you need to position your camera correctly without accidentally exposing your character to the entity's vision cone.
Another reliable strategy involves using the game's crouch mechanic in combination with low walls and barriers. Many of the decorative elements in the game, such as planters, benches, and low partitions, are exactly tall enough to hide a crouched player from the entity's line of sight. Players who learn to identify these hiding spots can navigate through areas that would otherwise require risky sprints across open ground.
| Hiding Spot Type | Height Coverage | Reliability | Best Used For |
|---|---|---|---|
| Doorways | Full body | Very High | Breaking active chases |
| Pillars | Full body | High | Waiting out patrol cycles |
| Low walls | Crouched only | Medium | Crossing open areas |
| Furniture | Crouched only | Medium | Short-term concealment |
| Corners | Full body | High | Observing patrol routes |
The SpongeBob Balloon Entity and Its Connection to the Looker
The unseen liminality spongebob balloon entity is one of the more bizarre additions to the game, and many players wonder whether it is connected to the looker's behavior in any meaningful way. According to community reports, the balloon entity spawns in specific locations throughout the map and drifts slowly through the environment without any apparent purpose. Unlike the following chair, the balloon does not actively hunt players, but it can still cause problems if you are not paying attention.
The primary danger of the unseen liminality spongebob balloon is that it can obscure your vision at critical moments, particularly when you are trying to track the looker's position. The balloon is roughly the size of a standard beach ball and floats at head height, which means it can block your view of the corridor ahead if you are positioned directly behind it. Players have reported instances where the balloon drifted into their line of sight just as the chair entity was approaching, causing them to lose track of the threat and get caught.
There is also some evidence suggesting that the balloon entity may attract the looker's attention under certain conditions. Several players have reported that the chair entity will occasionally change its patrol route to investigate the balloon's position, although this behavior appears to be inconsistent and may depend on the specific level layout. The official Roblox game page does not provide detailed information about this interaction, so it remains unclear whether this is intentional design or a quirk of the entity's pathfinding system.
| Balloon Behavior | Frequency | Risk Level | Recommended Response |
|---|---|---|---|
| Drifting through corridors | Common | Low | Move around it carefully |
| Blocking sightlines | Occasional | Medium | Reposition to maintain visibility |
| Attracting looker attention | Rare | High | Leave the area immediately |
| Floating near hiding spots | Occasional | Medium | Choose a different hiding spot |
How to Handle Balloon Encounters Safely
When you encounter the balloon entity during a looker encounter, your priority should always be maintaining visual contact with the chair rather than investigating the balloon. The balloon poses no direct threat to your character, but losing sight of the looker can be fatal if the entity is already in its locked state. If the balloon drifts into your line of sight while you are being chased, the safest option is to break line of sight with the chair first, then reposition to regain visibility of both entities.
Players who are exploring areas where the balloon spawns frequently should take extra care when navigating corners and intersections, since the balloon's unpredictable movement can create sudden blind spots. A practical approach is to listen for the chair's audio cue before entering any new area, then wait a few seconds to see if the balloon drifts into view before committing to your movement. This cautious approach may slow down your exploration slightly, but it significantly reduces the risk of being caught off guard.
The balloon entity also serves as a useful warning indicator in some situations, because its presence often signals that you are in an area where the looker is likely to patrol. While this connection is not confirmed by official sources, many experienced players use the balloon's appearance as a cue to switch into stealth mode and start paying closer attention to their surroundings. This habit is particularly valuable in the deeper Areas of Interest, where the chair entity's patrol routes become more unpredictable.
Advanced Movement Techniques for Looker Encounters
Once you have mastered the basic stealth mechanics, you can begin incorporating more advanced movement techniques that give you greater flexibility during looker encounters. The unseen liminality looker guide would be incomplete without covering these techniques, because they often mean the difference between escaping a locked chase and getting caught in an open corridor. These techniques require practice to execute reliably, but they dramatically expand your options when the entity is actively hunting you.
The most important advanced technique is the "corner break," which involves sprinting toward a corner and then immediately crouching as you turn around it. This movement pattern breaks the entity's line of sight at the exact moment you change direction, causing the chair to lose tracking and return to its patrol state. The technique works because the entity's vision cone does not extend through walls, and the sudden crouch reduces your visibility range just as you enter the corner's cover.
Another valuable technique is the "stutter step," which involves alternating between sprinting and crouch walking in short bursts. This movement pattern makes it harder for the entity to lock onto you, because your visibility range constantly fluctuates between the sprint and crouch values. While this technique does not guarantee that you will avoid detection, it can buy you precious seconds when you need to cross an open area without adequate cover.
-
Practice the corner break in safe areas — find a location with no entities and practice the sprint-crouch-turn sequence until it becomes muscle memory
-
Use the stutter step for open crossings — alternate between sprint and crouch every two seconds to keep your visibility range unpredictable
-
Master the door pause — when passing through doorways, pause for half a second on the other side to ensure the entity has not locked onto you
-
Learn to read patrol patterns — spend time observing the chair's route before attempting to cross its patrol zone
-
Combine techniques for maximum effectiveness — use a corner break followed by a stutter step to cross dangerous intersections safely
When to Fight Back Versus When to Flee
Unlike some other entities in the game, the following chair cannot be defeated through direct confrontation, which means you must always choose between fleeing and hiding. The unseen liminality chair entity has no health bar and cannot be stunned or knocked over, so attempting to fight it is always a losing proposition. Your only meaningful choices are breaking line of sight to end the chase, or finding a hiding spot and waiting for the entity to lose interest.
The decision between fleeing and hiding depends primarily on your proximity to a safe area and the availability of cover along your escape route. If you are within 30 studs of a doorway or corner, fleeing is usually the better option because you can break line of sight quickly and end the chase. If you are in an open area with no nearby cover, hiding behind the nearest object and waiting for the entity to pass is often safer than attempting a desperate sprint.
Players who are exploring with friends can use a coordination strategy where one player acts as a distraction while the others move through the area. The distraction player positions themselves in the entity's line of sight, triggering a chase, then leads the chair away from the group's intended path. This strategy requires good communication and timing, but it can be highly effective for moving through areas with limited cover.
Optimizing Your Settings for Better Looker Awareness
Your game settings can have a significant impact on your ability to detect and avoid the looker entity, and many players overlook this aspect of preparation. The Unseen Liminality beta on Roblox recommends playing on max graphics settings, which not only improves the visual experience but also makes the entity's visual cues easier to spot. Lower graphics settings can reduce the visibility of the static trail and make it harder to distinguish the chair's animation changes.
The field of view setting is particularly important for looker encounters, because a wider FOV allows you to see more of your surroundings and spot the entity earlier. However, a very wide FOV can also make distant objects appear smaller, which can make it harder to judge distances accurately. Most experienced players recommend a FOV setting between 90 and 100, which provides a good balance between situational awareness and distance perception.
Audio settings are equally important, since the chair entity's approach is signaled by a subtle hum that can be easy to miss if your audio is too quiet or your sound effects are overwhelmed by music. Consider turning down the game's music volume and increasing the sound effects volume to ensure you can hear the entity's audio cue clearly. Some players also recommend using headphones rather than speakers, since the directional audio helps you determine which direction the entity is approaching from.
| Setting | Recommended Value | Impact on Looker Encounters |
|---|---|---|
| Graphics Quality | Max | Improves visibility of visual cues |
| Field of View | 90-100 | Balances awareness and distance perception |
| Sound Effects Volume | High | Ensures audio cue is audible |
| Music Volume | Low | Prevents masking of entity sounds |
| Mouse Sensitivity | Medium-High | Allows quick camera turns for corner peeks |
The Role of the Captain and Other Entities in Looker Zones
The looker does not operate in isolation, and understanding how it interacts with other entities can help you avoid dangerous situations. The Captain entity is particularly relevant, because it shares some patrol areas with the following chair and can create compound threats when both entities are active in the same region. Players who are unfamiliar with the Captain's behavior should review the Captain entity guide before attempting to navigate areas where both threats are present.
When the Captain and the looker are active in the same area, you need to track both entities simultaneously, which significantly increases the cognitive load of navigation. The Captain tends to patrol more predictable routes than the looker, which can actually work in your favor if you use the Captain's position as a reference point for planning your movement. However, the combination of two active threats means you have fewer safe windows for crossing open areas, and you may need to wait longer between movements.
The Mimic entity can also complicate looker encounters, because mimics disguise themselves as ordinary objects and can trigger when you get too close. If you are focused on tracking the looker's position, you may accidentally trigger a mimic and create a second threat that forces you to split your attention. Players who want to understand how to handle these compound situations should consult the Mimic entity survival guide for detailed strategies.
Frequently Asked Questions
What is the best way to avoid the looker in Unseen Liminality?
The most reliable method is to maintain constant awareness of the entity's position and break line of sight before it enters its locked state. Crouch when the entity is within 30 studs, use doorways and corners for cover, and never sprint through open areas where the chair has a clear view of your position.
Can the following chair entity be defeated or stunned?
No, the following chair entity cannot be defeated through any known method. It has no health bar and is immune to all forms of interaction, so your only options are breaking line of sight to end a chase or hiding until it loses interest. Attempting to fight the entity always results in being caught.
How does the SpongeBob balloon entity affect looker encounters?
The SpongeBob balloon entity does not directly attack players, but it can obscure your vision and occasionally attracts the looker's attention. If the balloon drifts into your line of sight during a chase, prioritize maintaining visual contact with the chair and reposition to regain a clear view of both entities.
What settings should I use to improve my chances against the looker?
Play on max graphics settings to improve visibility of visual cues, set your field of view between 90 and 100, and increase sound effects volume while lowering music volume. These settings help you detect the entity earlier and track its position more effectively during encounters.
Are there any safe areas where the looker cannot spawn?
The looker ignores true safe zones—even small rooms and dead ends see spawns, though less frequently. In Unseen Liminality, treat every corner as a risk; your best defense is constant motion and sound-checking before entering. No spot guarantees safety, only reduced odds.